Homelab Pt 6 - Implementing Key Pair SSH Authentication

Introduction
Throughout the process of building out my homelab, I’ve exposed SSH internally on various endpoints in order to easily manage them from my personal endpoint. So far, I’ve allowed for authentication via username & password which isn’t ideal for a plethora of reasons, namely opening up my endpoints to the risk of attackers with a foothold in my network being able to brute-force/spray the credentials and move laterally (T1110.003). While there are mitigations that could be implemented such as fail2ban to identify and stop those types of attacks, I’d simply prefer if they weren’t possible in the first place.
In this post, I’ll walk through the process of generating password-protected keys for SSH, implementing key pair authentication on my current endpoints using those keys, and demonstrate how I’ll implement key pair authentication on future endpoints from the time of SSH exposure. Seeing as my authentication keys will be stored on my personal endpoints (something I have) and will be password protected (something I know), this key pair authentication will also serve as a form of multi-factor authentication.
Staging Keys
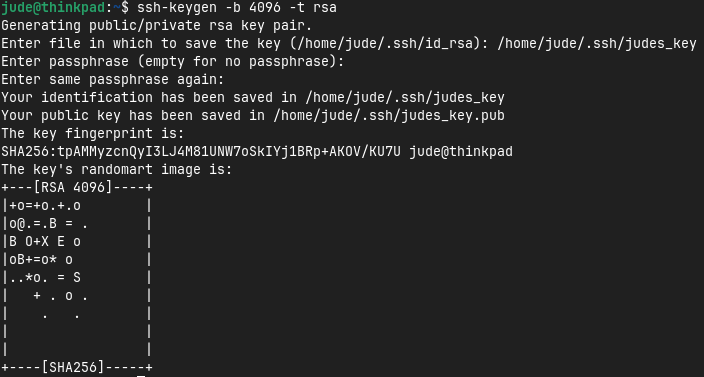
Heading over to my endpoint, which is running an Ubuntu-based distro, I’ll be using the ssh-keygen command to generate a 4096 bit RSA key pair. To do this, I’ll run the following:
1
ssh-keygen -b 4096 -t rsa
After choosing the location to store my key pair and entering the passphrase that will protect them, I am presented the fingerprint and randomart of my public key and my keys have been created!
Now with my key pair created, I can start to distribute my public key to my endpoints. While I could do this by simply copying and pasting the contents of my public key to the authorized keys file on my endpoints, there is a handy tool called ssh-import-id that simplifies this process. This tool takes advantage of Github hosting users’ public keys located at https://github.com/username.keys by downloading the public keys and adding them to the authorized keys files by simply providing a Github username.
To use this tool, I’ll head to Github and upload the public key I just generated in my user settings. After doing this if I head to https://github.com/judelanning.keys, I can see my public key!

Of course this is relying on a third party providing a service they have no obligation to, but I don’t see this functionality going anywhere anytime soon. If worse comes to worst, I can always copy and paste my keys as mentioned earlier.
Now with my public key on Github, I can start to transition my endpoints from username & password authentication to instead using the key pair I’ve just created.
Current Endpoints
While I’ll be switching every endpoint to key pair authentication where I have SSH exposed internally, I’ll only show the process for one for the sake of brevity. I’ll start with my Graylog endpoint, which has SSH exposed and accepts username & password authentication. Since Graylog is running on Ubuntu 22.04, which has ssh-import-id pre-installed, I can jump right into importing my public key. If this wasn’t the case, I would have to install ssh-import-id before following my next steps.
To import my public key from Github, I’ll run the following command:
1
ssh-import-id gh:judelanning
This will fetch my public key from Github and append it to the authorized keys file on the Graylog host. After running it, I can see that my key was successfully fetched and added! 
To verify the change is working, I’ll attempt to SSH into Graylog using the following command:
1
ssh -i /home/jude/.ssh/judes_key [email protected]
Once entered, I am now authenticated to the Graylog server - the server accepted my private key so the changes have stuck and worked.

Now all that’s left is to disable password authentication. To do this, I’ll edit the file located at /etc/ssh/sshd_config and comment out the line that allows for password authentication.
1
PasswordAuthentication yes -> #PasswordAuthentication yes
With this now disabled, the only way someone can authenticate to my Graylog server through SSH is by possessing my private key and knowing the passphrase that protects it.
Future Endpoints
For new endpoints there are a couple of different ways I can go about enabling SSH key pair authentication. When installing Ubuntu server to an endpoint, they have support importing public keys from Github & Launchpad while configuring the system. This is done on the screen where I’m prompted to install OpenSSH to the endpoint shown here:
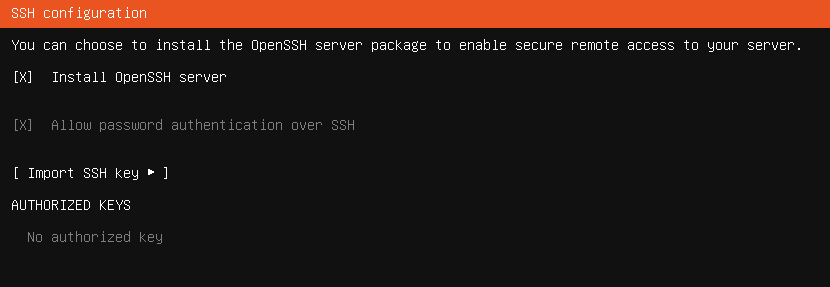
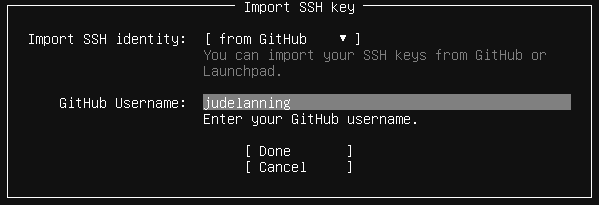
On this page I’ll go to “Import SSH Key”, select Github as the source, and enter my Github username.
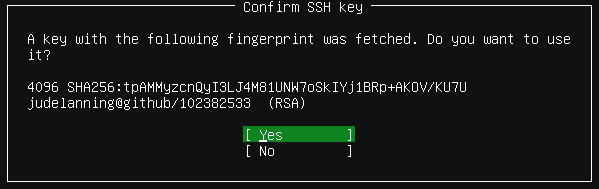
After proceeding, I am prompted that my key was fetched and if I wish to import it.
Once imported, the key is added to the authorized keys file and I’ll be able to SSH into the machine with my private key as authentication.

If I were using a non-Ubuntu based system that doesn’t have this functionality, I could simply install ssh-import-id to the endpoint and import the key before exposing SSH similar to what I did with my existing endpoints above. Really anything that adds my public key to the authorized keys file on the target system works just fine.
Closing Thoughts
Although these changes were relatively simple, my security posture is now greatly improved against internal attackers that may be looking to move laterally via SSH within my network.
Thanks for taking the time to read this post and feel free to reach out via LinkedIn if you have any questions!
![]()